I discovered an interesting false cognate in church today between Greek and Hawaiian. False cognates, for the curious, are two words from different languages that sound similar and have the same meaning, but have no linguistic history between them. An example would be the word dog (meaning a domesticated canine), which means the same thing and is pronounced the same in both English and the Australian Aboriginal language Mbabaram despite having developed completely independently. Another case would be the Hawaiin word kahuna, which means “priest”, and the Hebrew word k'huna (כְּהוּנָה) which means “priesthood”.
The one I discovered today is between the Hawaiian word pau, meaning “finished, done, ended,” and the Koine Greek root παύ- (pau-), meaning “stop, cease, to stop or make cease.” It wasn't in the list of false cognates on Wikipedia when I checked today, so as far as I know I may be the first person ever to notice it (given that there are probably not that many people who are familiar with both Koine Greek and Hawaiian). It's in the list now because I added it while writing this post.
(Edit 3/23/19: The Wikipedia list has since been shortened dramatically to just a few examples, not including this one, and on reflection this was probably noticed by the missionaries translating the Bible into Hawaiian a hundred and fifty-odd years ago. Oh well, it's still an interesting find.)
Anyone else out there have any interesting ones to share that aren't yet in Wikipedia? Feel free to post 'em here and add 'em to the list if you do!
Sunday, April 28, 2013
Saturday, April 27, 2013
Adventures at the James Clerk Maxwell Telescope
Two weeks ago I was privileged to be invited up to the summit of Mauna Kea to the James Clerk Maxwell Telescope as part of my job. Well, I say that, but really the only reason I was there was as a "warm body" – safety regulations require a minimum of two people together up at the summit at all times, in case of medical emergency, so my specific job had nothing to do with it.
Which I don't mind at all! It meant I got to go up with no real responsibilities besides crisis management in the event that something came up, which it didn't. I was therefore free to get a tour of the telescope that I officially work for, and wander around to get some pictures.
For instance, this black machine here is the water vapor meter, whose output I work with a lot. It measures the amount of water vapor in the air, which directly (and dramatically) affects the opacity of the atmosphere in the sub-millimeter wavelengths we observe in. It's been having some issues, so it was actually replaced with a different (silver) one just last week.

This big blue machine down here is SCUBA-2, the Sub-millimeter Common User Bolometer Array (2). This is another instrument whose output I work with on a regular basis. It's basically the best sub-millimeter camera in the world today.

It also happens to be the coldest place in the known universe. You think outer space is cold? Out far away from hot stars and galaxies, in the inter-galactic voids of space, the temperature can drop to about 2.7 kelvins, the temperature of the cosmic microwave background radiation, which is about 2.7 degrees Celsius above absolute zero (which is -273.15 °C or -459.67 °F).
That's cold alright, but it's still quite a bit hotter than the temperature of the SCUBA-2 imaging arrays, which are kept a mere one-tenth of a kelvin above absolute zero.
(The reason for such cold temperatures is that, in order to get a reasonably high signal-to-noise ratio from the electronic imaging arrays used in astronomy and digital cameras, the imaging array itself has to be cold enough that it's not emitting too much electromagnetic radiation in the portion of the spectrum it's trying to take a picture of. Consumer digital cameras work because they aren't glowing at visible wavelengths. Another way to think about it is that trying to take images in the sub-millimeter portion of the spectrum [which comes from objects that are themselves quite cold already] is like trying to take pictures with a digital camera that is on fire. The amount of light given off by the camera at that point is so much that you won't catch much light coming from what you want to photograph by comparison.)
Anyway, this is a panorama I took from behind the telescope looking up at the back of the dish. It's slightly misleading; it looks like it's looking at the sky, but that's actually the world's largest piece of Goretex (no joke). It also looks like it has a square opening, but that's a result of the image stretch due to the panorama. It's actually more like a rectangular slice in the side of a cylinder. (Unfortunately I forgot to take a picture of it from the outside.)

Finally, here's a high dynamic range image of the back of the dish. I had to take this one lying on the floor to get it all in, hence the slightly off-horizontal angle.

For those who don't know what the JCMT looks like from the outside, here's a picture of it from back in 2010 while I was up on a summit tour. It's the white cylinder on the middle-left. The opening is on the left side of the cylinder in this picture (the whole building rotates to point the telescope), but it wasn't actually open at the time.

Sunday, April 21, 2013
Spelunking Emesine Cave, Part 3
This will be the third and final part of the Emesine Cave photos, finally. At the end of the last post we'd made it as far as we could in Emesine Cave. Coming back out I got a few more photos of things I either hadn't photographed or hadn't noticed on the way in.
Just before the end of the cave, I found another example of a tube-in-tube formation.

I found some sort of fossil imprint, probably from a tree of some kind, in a bit of roof-collapse (some very orange roof-collapse):

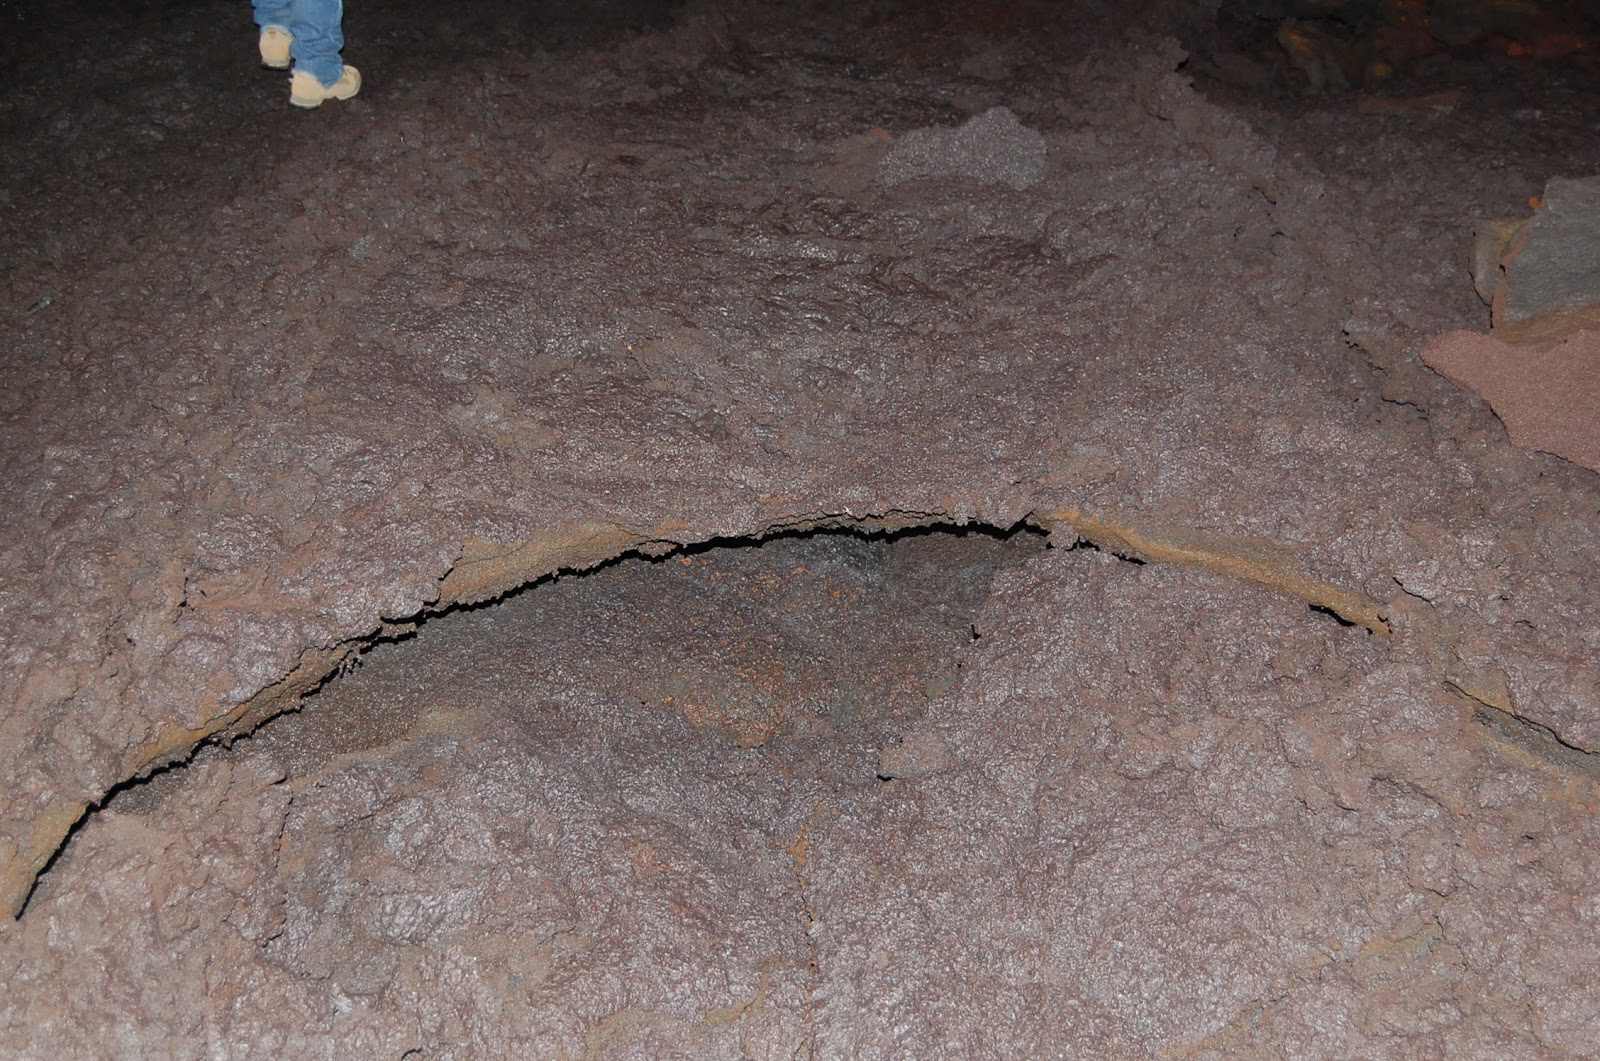
This large dip in the floor, where lava apparently poured over a lip of some kind, was pretty much the only place in the cave where the floor wasn't fairly smooth and nearly level. (Barring the places where you had to climb over ceiling collapse, which were few and far between.)

I also found these lavacicles with interesting accumulations of minerals on their lower ends. I'm not sure how that would happen. Maybe the lava level rose after they formed, but cooled somewhat and some stuff crystallized out onto the pre-existing structure? I don't know.

My coworker pointed out this amazingly thin formation. That paper-thin-looking part? It really is paper-thin. It just looks too fragile to form, let alone exist in this environment.

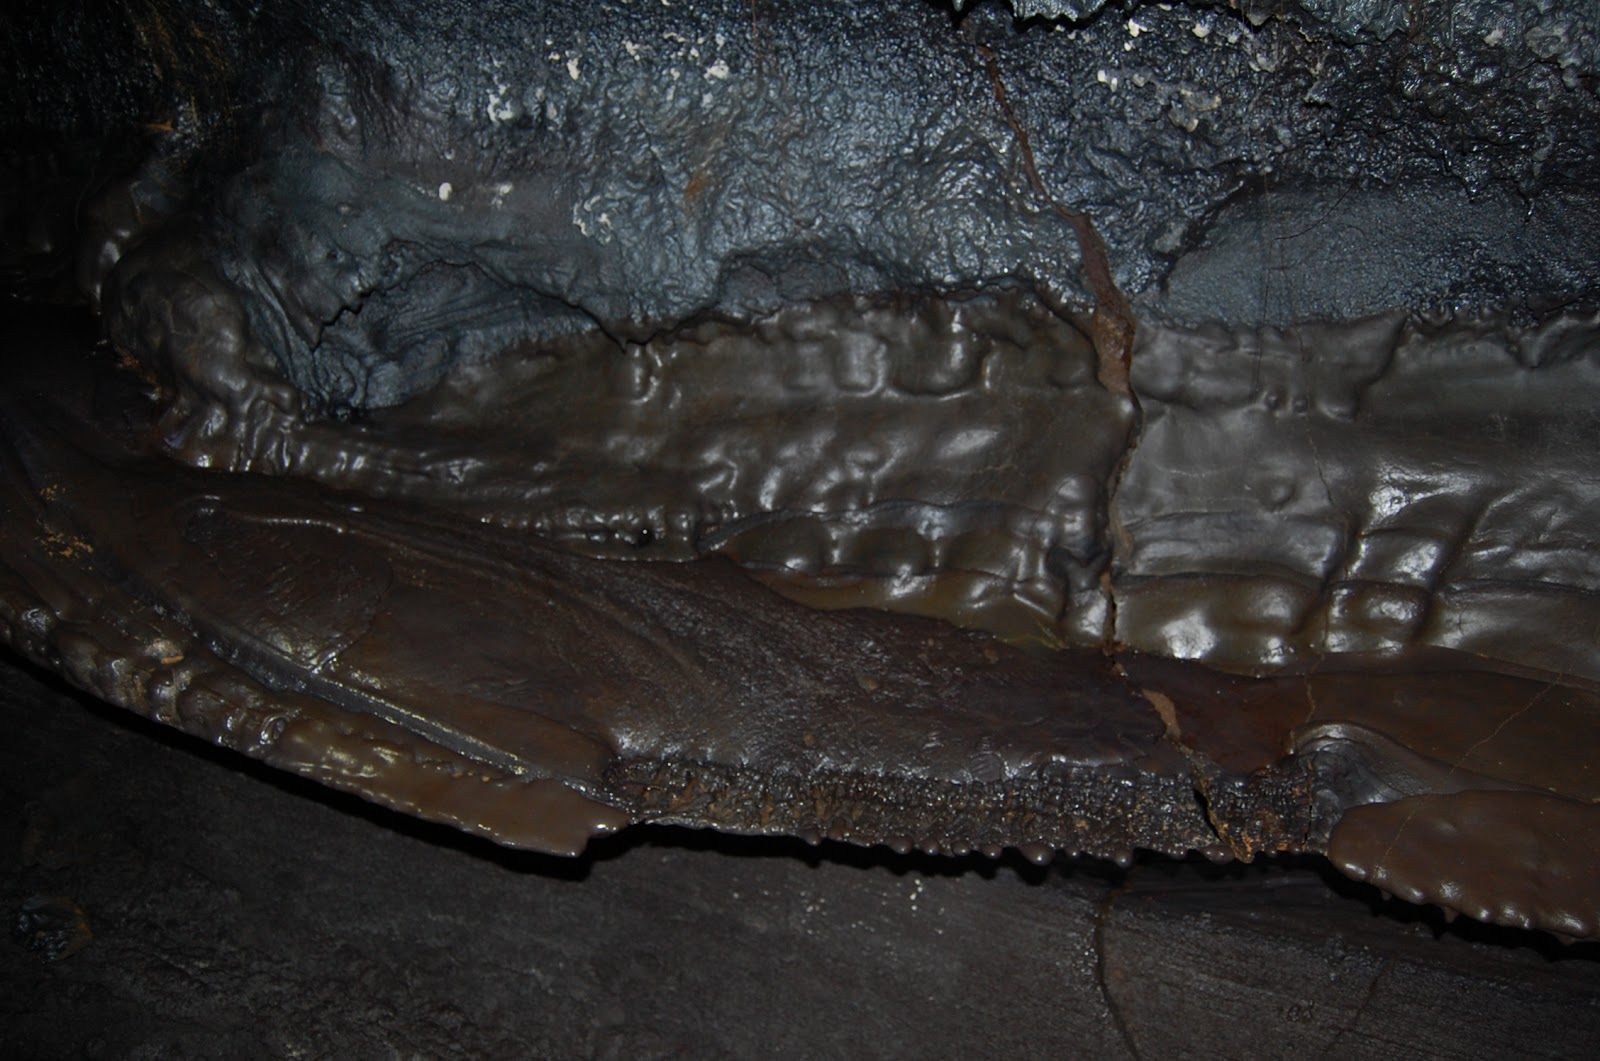
This next picture reminds me of cetaceans, or pinnipeds, for some reason. It just looks like blubber. It looks like lava flowed over onto the area at least five different times with varying flow rates each time.

Finally, just inside the cave mouth, I found these neat crystals growing on a lavacicle. I don't know what kind of mineral they are, I'm afraid. Very delicate looking and pretty though.

Well, I finally got through all my pictures of Emesine Cave. And I still have nearly as many again that I didn't show, for one reason or another. The walk back was uneventful, barring a continuous light rain from the east that, due to the straightness of the path and the constancy of the rain, left my right side soaked but my left side dry in places by the time I got back to the trail head. I've got more pictures for my next post, but of a slightly different subject. Until then, a hui hou!
Just before the end of the cave, I found another example of a tube-in-tube formation.
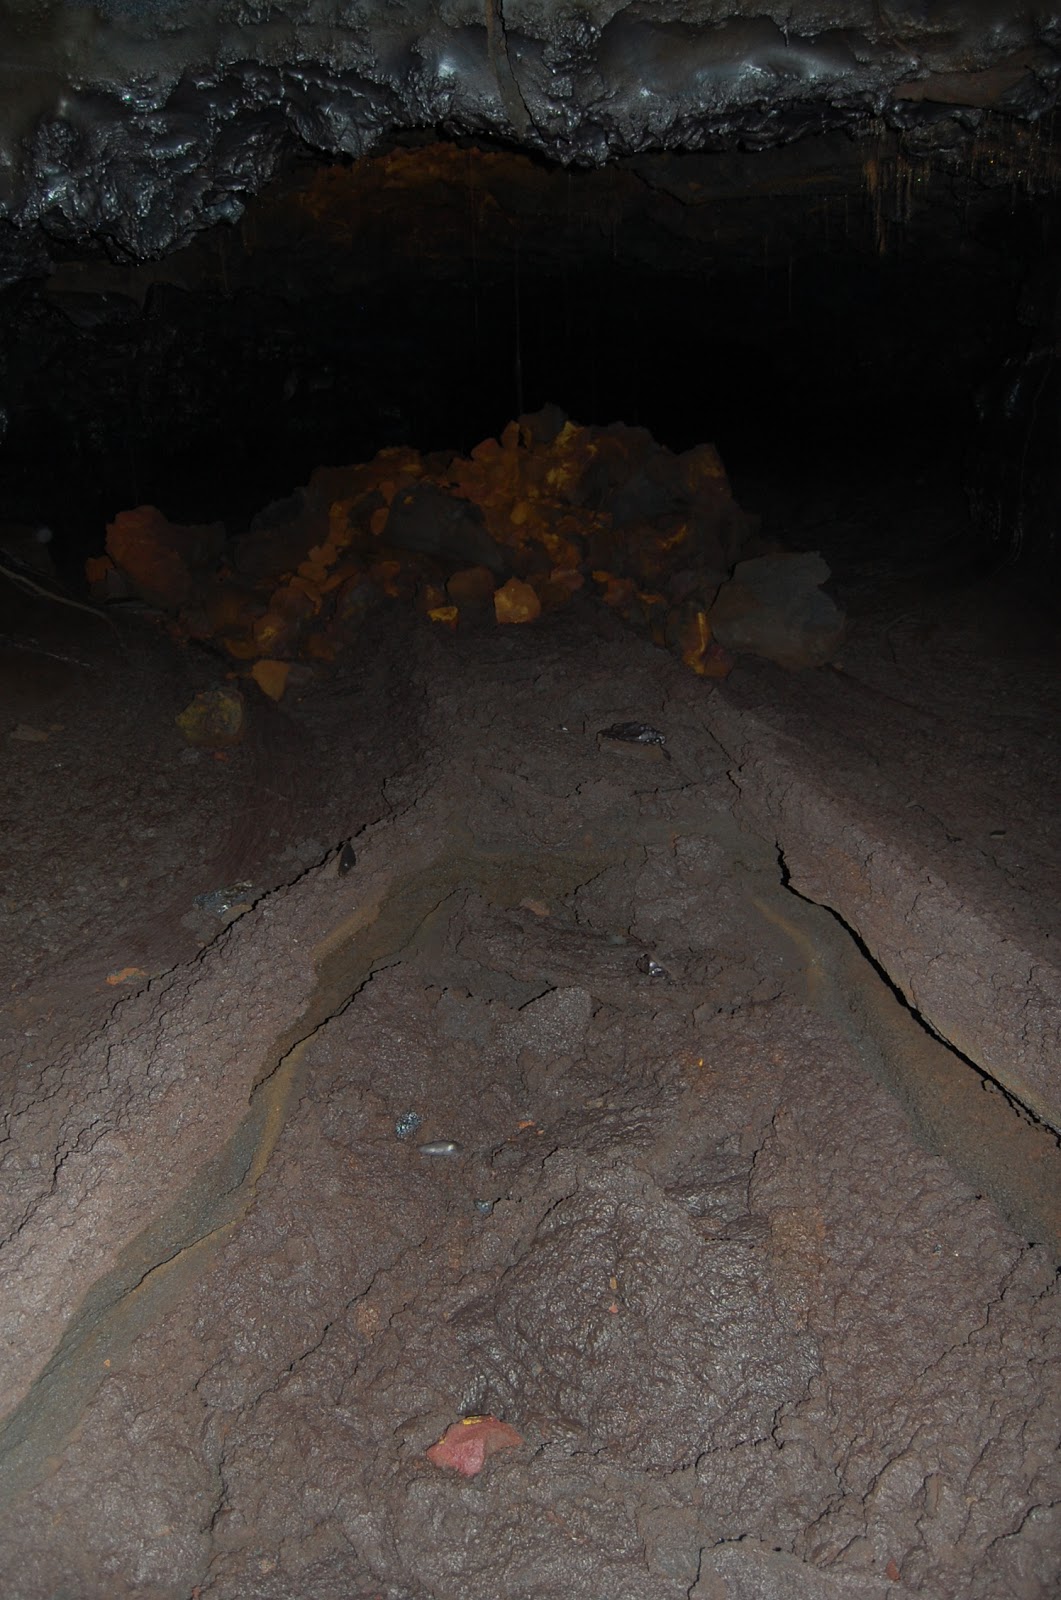
I found some sort of fossil imprint, probably from a tree of some kind, in a bit of roof-collapse (some very orange roof-collapse):

This large dip in the floor, where lava apparently poured over a lip of some kind, was pretty much the only place in the cave where the floor wasn't fairly smooth and nearly level. (Barring the places where you had to climb over ceiling collapse, which were few and far between.)

I also found these lavacicles with interesting accumulations of minerals on their lower ends. I'm not sure how that would happen. Maybe the lava level rose after they formed, but cooled somewhat and some stuff crystallized out onto the pre-existing structure? I don't know.

My coworker pointed out this amazingly thin formation. That paper-thin-looking part? It really is paper-thin. It just looks too fragile to form, let alone exist in this environment.

This next picture reminds me of cetaceans, or pinnipeds, for some reason. It just looks like blubber. It looks like lava flowed over onto the area at least five different times with varying flow rates each time.

Finally, just inside the cave mouth, I found these neat crystals growing on a lavacicle. I don't know what kind of mineral they are, I'm afraid. Very delicate looking and pretty though.

Well, I finally got through all my pictures of Emesine Cave. And I still have nearly as many again that I didn't show, for one reason or another. The walk back was uneventful, barring a continuous light rain from the east that, due to the straightness of the path and the constancy of the rain, left my right side soaked but my left side dry in places by the time I got back to the trail head. I've got more pictures for my next post, but of a slightly different subject. Until then, a hui hou!
Sunday, April 14, 2013
Spelunking Emesine Cave, Part 2
So, when I left off in the last post, we had just made it to the single skylight in this section of Emesine Cave. Unlike the entrance, the collapsed rock in this one didn't afford an easy way of entrance or exit. We passed on back into the murky gloom of the cave, our night vision acquired over the previous 30 minutes gone once again.
Once we'd readjusted our eyes to the darkness, we started to see some amazing speleothems (a word referring to just about any kind of secondary mineral formation in a cave). Probably due in part to the lower flux of tourists in Emesine Cave, there are a lot of very fragile lavacicles still clinging to the roof of the cave along its length. Take a look at these beauties:

Lavacicles (I had to add that word to my browser's dictionary just now) form when the roof of the tube cools enough to form a sort of skin over still semi-molten material. As the temperature of this material drops, dissolved gases inside begin to precipitate out of solution, displacing molten material and forcing it out through the skin like toothpaste out of a tube. After they solidify they make excellent channels for water precipitating on the ceilings to run down, as you can see by the drops of water hanging from their tips.
If this sort of thing happens lower down on the walls rather than the ceiling, you get structures like those seen below:


Here's a close-up picture of a bit of lavacicle that I found broken-off on the ground for scale: they all tend to be about this thick. This one is solid on the inside (though you can't see it), but you'll see some later on that are hollow.

We found some really long lavacicles in places. This one was probably nearly a foot and a half long (it was on the ceiling some ten feet up, so I couldn't get a close look).

Some of the lavacicles were quite interesting. As I mentioned, lavacicles form from gasses bubbling out of molten material. The gasses apparently can flow out through the forming lavacicles, leaving them hollow. This leads to a sort of formation that appears very similar to a soda straw (a type of formation in karst caves that are formed differently, but look strikingly similar). You can tell that the lavacicles in the picture below were hollow because of the way they collapsed. I find these structure quite remarkable (as you can tell by how much I'm remarking on them).

This picture doesn't have anything specific I want to point out, I just loved the contrast between the various textures in the picture.

In places there were dozens of lavacicles hanging down from the ceiling. There were also roots, as there typically are in these lava tubes.

I found this little lump of anomalously-colored material at one point along the way. Dunno what's causing the orange color, though my guess is that it's iron.

Some more of those amazing flattened soda-straws, most of them flattened in two or more different directions:

There wasn't much in the way of tube-in-tube formations, but I did find some:

This picture is pretty neat. It's the cast of a tree that fell over into lava and subsequently burned up or rotted away after the lava had cooled. You can clearly see where the branches forked in this picture (looking towards where the fork splits from the direction the roots would have been). Interestingly, this cast is on the ceiling, so I don't know what specific sequence of events led to its creation.

Anyway, I think that's all for the pictures I took on our way into the cave. I still have some more to go through that I took on our way back out, but I think I'll save those for a third post as this one's already getting a bit long.
Once we'd readjusted our eyes to the darkness, we started to see some amazing speleothems (a word referring to just about any kind of secondary mineral formation in a cave). Probably due in part to the lower flux of tourists in Emesine Cave, there are a lot of very fragile lavacicles still clinging to the roof of the cave along its length. Take a look at these beauties:

Lavacicles (I had to add that word to my browser's dictionary just now) form when the roof of the tube cools enough to form a sort of skin over still semi-molten material. As the temperature of this material drops, dissolved gases inside begin to precipitate out of solution, displacing molten material and forcing it out through the skin like toothpaste out of a tube. After they solidify they make excellent channels for water precipitating on the ceilings to run down, as you can see by the drops of water hanging from their tips.
If this sort of thing happens lower down on the walls rather than the ceiling, you get structures like those seen below:


Here's a close-up picture of a bit of lavacicle that I found broken-off on the ground for scale: they all tend to be about this thick. This one is solid on the inside (though you can't see it), but you'll see some later on that are hollow.

We found some really long lavacicles in places. This one was probably nearly a foot and a half long (it was on the ceiling some ten feet up, so I couldn't get a close look).

Some of the lavacicles were quite interesting. As I mentioned, lavacicles form from gasses bubbling out of molten material. The gasses apparently can flow out through the forming lavacicles, leaving them hollow. This leads to a sort of formation that appears very similar to a soda straw (a type of formation in karst caves that are formed differently, but look strikingly similar). You can tell that the lavacicles in the picture below were hollow because of the way they collapsed. I find these structure quite remarkable (as you can tell by how much I'm remarking on them).

This picture doesn't have anything specific I want to point out, I just loved the contrast between the various textures in the picture.

In places there were dozens of lavacicles hanging down from the ceiling. There were also roots, as there typically are in these lava tubes.

I found this little lump of anomalously-colored material at one point along the way. Dunno what's causing the orange color, though my guess is that it's iron.

Some more of those amazing flattened soda-straws, most of them flattened in two or more different directions:

There wasn't much in the way of tube-in-tube formations, but I did find some:
This picture is pretty neat. It's the cast of a tree that fell over into lava and subsequently burned up or rotted away after the lava had cooled. You can clearly see where the branches forked in this picture (looking towards where the fork splits from the direction the roots would have been). Interestingly, this cast is on the ceiling, so I don't know what specific sequence of events led to its creation.

Anyway, I think that's all for the pictures I took on our way into the cave. I still have some more to go through that I took on our way back out, but I think I'll save those for a third post as this one's already getting a bit long.
Tuesday, April 9, 2013
Spelunking Emesine Cave, Part 1
About two weeks ago on Good Friday I organized an excursion with some friends to explore Emesine Cave, a lava tube high on the flank of Mauna Loa created in the 1880-1881 eruption that came perilously close to destroying Hilo. It exists as several disconnected sections totaling over ten miles in length, making it the fourth-longest lava tube in the world as of right now. However, the section we explored at about 2,300 meters (5,700 feet) elevation was only about a mile in length.
I took quite a few pictures this trip, so much so in fact that after looking through them I've decided to split this post into multiple parts.
Unlike the Kaumana Caves county park where the entrance is just a few dozen feet from the parking lot, the entrance to Emesine Cave is found only after a 2.6 mile hike at nearly 6,000 feet. For being so high, the lower air pressure didn't really bother anyone as I was afraid it might. WolframAlpha suggests the pressure would be about 812 millibars, which is close to 80% of sea-level pressure, so I guess it wasn't really that bad. Hindsight, and all that.
The hike was pleasant, following the remains of a straight road that remained mostly flat or only slightly inclined along its length. We passed through several stands of older forest among the more barren and recent lava plains. Hawaiian has a word for these islands of older forest surrounded by newer flows of lava: kīpuka. These particular kīpuka are great habitats for some of the endemic Hawaiian birds, and it was really lovely to get out of the constant background noise of Hilo and hear some actual birdsong again. We didn't see many birds, but the sound of their song was a constant background for us along our trek.
Here's a panorama I took with my phone. I think it does a good job of capturing the feeling of the vast lava plains we were traversing.

Unfortunately you can't really see much in it, other than the dark surface of the lava in the shadow of all those fluffy clouds. If you click on it to blow it up, you can see the base of Mauna Kea off to the left.

Along the way I had some of these pointed out to me. They're called ʻŌhelo berries, or Vaccinium reticulatum. They're actually edible (and related to cranberries), so I ate a few. They grow wild at altitudes between 640–3,700 m (2,100–12,100 ft) in the rich volcanic soil, and are a popular ingredient in home-made jams and jellies in Hawai‘i, in the same way wild raspberries or blackberries might be on the mainland. The ones I consumed mostly didn't have much taste, but some of them were moderately sweet. The color doesn't necessarily indicate ripeness, I later learned.
When we finally got to the entrance, we found a large skylight perhaps thirty to forty feet across and about twenty feet deep that provided entrance to the tube. Unlike Kaumana Caves, there were no easy-access steps-with-accompanying-handrail going down into this one, so we had to clamber down the jumble of collapsed rock inside that fortunately came up close enough to the edge on one side to permit entry.
Since the guidebook I'd read said that the uphill side of this section was fairly uninteresting, we headed downhill.
There are a lot of interesting features in Emesine Cave. It's also an easier walk nearly its entire length than much of Kaumana Caves, which was nice. Most of the floor is easily-traversable cauliflower ʻaʻā, with little of the collapsed rock from the roof that makes Kaumana Caves so difficult to explore in places. Emesine Cave also tends to have a flatter grade than Kaumana; up this high on the flank of Mauna Loa the lava was flowing nearly horizontally and traveled for great distances in fairly uniform conditions without losing much heat. Contrast that with Kaumana Caves, near the end of the flow, where the terrain was rougher and the flow more intermittent, producing a huge diversity of features that change rapidly on short distance scales.
Anyway, enough talk, you want pictures!

One thing that never gets old in lava tubes is the amazing variety of colors. This photo was taken near the entrance, so I think the green is some kind of photosynthesizing-life, but it might also be olivine. And the white may be gypsum that crystallized out as the lava cooled.

This is a ledge extending out from the wall, showing where a tube-in-tube formation might have formed if the lava level had held steady.

Close-up of the previous picture. The saw-tooth structure is amazing, I've never seen anything like it before in a lava tube. Reminds me of a fish fin.

I love the whorls and contrast in this picture. It just doesn't look like solid rock, does it?

There are some massive formations of these kinds of lava-cicles in Emesine Cave. Near the top of the picture just left of center you can see some that appear to come in ridges, which may have something to do with how air was flowing through the tube when they formed.

As you approach the first (and only) skylight in Emesine cave, the tube splits just before the opening, giving you two exits. This is the right one, which is traversable (I tried it coming back), but not comfortably (I had to hunker down and waddle through for about twenty feet).

The left side is easily walked at full height, even for me. (Ignore the roots in the foreground, they're hard to see in the dim light of your flashlight and it isn't until you get home and look at your pictures that you realize just how much light they reflect and how badly they interfere with your photos.)
Anyway, I think I'll end it here for now. Look out for the next part to come soon!
I took quite a few pictures this trip, so much so in fact that after looking through them I've decided to split this post into multiple parts.
Unlike the Kaumana Caves county park where the entrance is just a few dozen feet from the parking lot, the entrance to Emesine Cave is found only after a 2.6 mile hike at nearly 6,000 feet. For being so high, the lower air pressure didn't really bother anyone as I was afraid it might. WolframAlpha suggests the pressure would be about 812 millibars, which is close to 80% of sea-level pressure, so I guess it wasn't really that bad. Hindsight, and all that.
The hike was pleasant, following the remains of a straight road that remained mostly flat or only slightly inclined along its length. We passed through several stands of older forest among the more barren and recent lava plains. Hawaiian has a word for these islands of older forest surrounded by newer flows of lava: kīpuka. These particular kīpuka are great habitats for some of the endemic Hawaiian birds, and it was really lovely to get out of the constant background noise of Hilo and hear some actual birdsong again. We didn't see many birds, but the sound of their song was a constant background for us along our trek.
Here's a panorama I took with my phone. I think it does a good job of capturing the feeling of the vast lava plains we were traversing.

Unfortunately you can't really see much in it, other than the dark surface of the lava in the shadow of all those fluffy clouds. If you click on it to blow it up, you can see the base of Mauna Kea off to the left.

Along the way I had some of these pointed out to me. They're called ʻŌhelo berries, or Vaccinium reticulatum. They're actually edible (and related to cranberries), so I ate a few. They grow wild at altitudes between 640–3,700 m (2,100–12,100 ft) in the rich volcanic soil, and are a popular ingredient in home-made jams and jellies in Hawai‘i, in the same way wild raspberries or blackberries might be on the mainland. The ones I consumed mostly didn't have much taste, but some of them were moderately sweet. The color doesn't necessarily indicate ripeness, I later learned.
When we finally got to the entrance, we found a large skylight perhaps thirty to forty feet across and about twenty feet deep that provided entrance to the tube. Unlike Kaumana Caves, there were no easy-access steps-with-accompanying-handrail going down into this one, so we had to clamber down the jumble of collapsed rock inside that fortunately came up close enough to the edge on one side to permit entry.
 |
| Entrance to Emesine Cave. |
Since the guidebook I'd read said that the uphill side of this section was fairly uninteresting, we headed downhill.
There are a lot of interesting features in Emesine Cave. It's also an easier walk nearly its entire length than much of Kaumana Caves, which was nice. Most of the floor is easily-traversable cauliflower ʻaʻā, with little of the collapsed rock from the roof that makes Kaumana Caves so difficult to explore in places. Emesine Cave also tends to have a flatter grade than Kaumana; up this high on the flank of Mauna Loa the lava was flowing nearly horizontally and traveled for great distances in fairly uniform conditions without losing much heat. Contrast that with Kaumana Caves, near the end of the flow, where the terrain was rougher and the flow more intermittent, producing a huge diversity of features that change rapidly on short distance scales.
Anyway, enough talk, you want pictures!

One thing that never gets old in lava tubes is the amazing variety of colors. This photo was taken near the entrance, so I think the green is some kind of photosynthesizing-life, but it might also be olivine. And the white may be gypsum that crystallized out as the lava cooled.
This is a ledge extending out from the wall, showing where a tube-in-tube formation might have formed if the lava level had held steady.

Close-up of the previous picture. The saw-tooth structure is amazing, I've never seen anything like it before in a lava tube. Reminds me of a fish fin.

I love the whorls and contrast in this picture. It just doesn't look like solid rock, does it?

There are some massive formations of these kinds of lava-cicles in Emesine Cave. Near the top of the picture just left of center you can see some that appear to come in ridges, which may have something to do with how air was flowing through the tube when they formed.

As you approach the first (and only) skylight in Emesine cave, the tube splits just before the opening, giving you two exits. This is the right one, which is traversable (I tried it coming back), but not comfortably (I had to hunker down and waddle through for about twenty feet).

The left side is easily walked at full height, even for me. (Ignore the roots in the foreground, they're hard to see in the dim light of your flashlight and it isn't until you get home and look at your pictures that you realize just how much light they reflect and how badly they interfere with your photos.)
Anyway, I think I'll end it here for now. Look out for the next part to come soon!
Sunday, April 7, 2013
Expanding My Blog Horizons
About two weeks ago now, I got a task at work to do something I already do a fair amount of: writing a blog post. You see, the Joint Astronomy Centre has a blog that we use to keep interested users of our data reduction software up to date. I recently finished up my project that provides users more information (in the form of plots) about the observations taken on a particular night, and was asked to write a post on the blog (“Pipelines and Archives”) to explain it.
It probably won't be very informative if you aren't one of the cadre of scientists who actually uses the software, but it has some pretty pictures. (At least I think they're pretty; they're some of the automatically-generated graphs I spent two weeks working on.) If you're interested, you can check the post out here.
Also, although I haven't had time to finish it yet, I'm working on a post about the trip to Emesine Cave I took back on Good Friday. I've got a good number of pictures to sort through so it might take me a while, but I hope to have it up sometime this week.
Subscribe to:
Posts (Atom)