Sunday, December 29, 2013

What I've Been Doing on Vacation

It's been a busy vacation for me here in California. There have been parties to attend, old friends to catch up with, and the many little chores that are ubiquitous on the farmyard. For instance, my sister happened to have a bottle-baby pygmy goat this year, by the name of Arthur:


I mostly called him Squeaker due to his high-pitched bleating when wanting food or attention (I ended up bottle-feeding him a couple of times). If you're wondering why his ear and side have shaved patched on them, it's because he spent the first week of life in intensive care at UCDavis Veterinary Hospital.


He was quite the cute little chap, though, and seems to be doing fine. After using my powerbockers I definitely have a better understanding of what walking involves for goats, so it was interesting watching him trying out his legs and learning to leap and bound.

Anyway, I'll be back in Hawai‘i for the New Year, so I might have some more to say then. Happy New Year everyone! Hau‘oli Makahiki Hou!

Wednesday, December 18, 2013

Home for Christmas

This year I am – once again – back in California with my family for Christmas. Experience leads me to expect little in the way of posting from me for the next few weeks. So just in case I don't get around to it later, Mele Kalikimaka and Hauʻoli Makahiki Hou! Merry Christmas and a Happy New Year to all of you out there.

Sunday, December 8, 2013

Hiking Hawaiʻi's Great Crack

The Saturday after Thanksgiving I went on a hike with several co-workers to a location on Hawaiʻi known as the Great Crack. The Great Crack is, well, a giant crack on the south-west flank of Kīlauea. In fact, it roughly coincides with Kīlauea's comparatively laid-back south-west rift zone. For context, each Hawaiian volcano has two or three rift zones along which most of their activity is concentrated during their pre-shield and shield phases (along with their summit craters). For example, Mauna Loa has an east rift zone and a south-west rift zone, and its two main arms coincide with those zones. Kīlauea is similar, in that it has an east and a south-west rift zone. In Kīlauea's case, the east zone has historically been much more active. In the years since historically reliable reports of Kīlauea's eruptive activity began around 1820, the south-west rift zone has experienced just five events, compared to twenty-nine for the eastern rift zone.

Anyway, the Great Crack coincides with the south-west rift zone and stretches for a distance of seventeen miles down the flank of Kīlauea just outside Volcanoes National Park. It apparently had an eruptive event in 1974 (though I haven't been able to find just what was involved), and another in 1928 where lava seeped from the lower half of it. It's not exactly set up as a tourist attraction, unlike places such as Kīlauea caldera. There are no easy trails to it; it lies a few miles – at closest – to the island-encircling Māmalahoe highway. According to the GPS tracking app I used we hiked for almost three miles over rough-and-tumble terrain to get to it.

The vast bulk of Mauna Loa rises to its lofty head, lost in clouds.
This is the kind of terrain we were hiking over, short scrubby grass and trees intermixed with several-hundred-year-old lava flows. This is looking backwards towards Mauna Loa, however, which was behind as we hiked in. I'm honestly amazed we didn't get lost following the trail, as it was in many places not at all obvious that it actually was a trail.

Lovely rippled pāhoehoe.
Some of the nifty lava formations we were hiking over. You can tell this is old lava because of its brown color and weathered look (fresh lava is much more black).

Approaching the crack, “Mordor” began to be the comparison my mind made.
And for comparison, this is lava from 1928 (most likely). We ran into it extending perhaps a quarter mile from the crack all along its length (at least the part we hiked, which was near the middle). You can see how much darker it is.

The crack turned out to be widely variable in width along its length. Periodically it would close up entirely allowing us to walk from side to side, while in other places it was easily over a hundred feet wide. The wide sections all had lots of rubble on the floor that had obviously sheared off from the walls collapsing. This fact was not lost on us as we tried to approach the edge to look in! I kept feeling as I was walking that there were hollow pockets in the ground beneath my feet, which was unnerving, and promoted a great desire to walk softly and quietly. All that notwithstanding, I was still able to get some nice shots of some of the wide areas from further along where the crack closed up again.

Great Crack indeed.
Here's looking towards one section where it closed up from further along.

Another part of the crack.
Looking down along the crack.
It's a bit hard to see in this photo, but from this vantage point we could follow the path of the crack as it meandered down the slope till it disappeared in the distance over the cliffs. It's also hard to see, but there's a fence on the left side of the crack running roughly parallel with it which is the boundary of Volcanoes National Park.


The inner wall of the crack, in the places where it hadn't sheared off, looked very similar to what you might find in a lava tube.

We also saw a lot of lava tree casts along the way, which was pretty neat. The lava kind of piles up around the trees and hardens before the tree burns away, leaving this large lumps of solidified lava with holes in them. Sometimes the lava has a strangely rope-y or braided look to it, such as the one below:


Another thing I noticed as we went along were small, oddly shaped rocks that stuck out from their surroundings. As far as I can tell they were splatters of lava forcibly ejected from the crack at some point that held together through surface tension and hardened when they hit the ground. I got a picture of one at random, as they were scattered pretty liberally around the crack.


After the three-mile hike to the crack over rough terrain we didn't feel like too much more hiking over pāhoehoe, so after walking a bit down the crack (and coming to the overlook I tried to photograph) we turned back. The entire hike was about six and a half miles, though the vertical change was no more than a few hundred feet. I definitely wasn't expecting the three-mile hike through scrubby bushes and grass at the beginning, I thought it would be lava or mostly lava the entire way. Thankfully the weather was about as good as we could have hoped for, overcast and cloudy with a strong breeze from the south nearly the entire time keeping the vog away. All in all it was a fun hike. It's definitely not a casual hike with the trek in, but it's a great view when you get there.

Friday, November 29, 2013

Visiting Volcano National Park: Part III (also happy Thanksgiving!)

Finally, part three of my adventure to Volcanoes National Park three weeks ago. It's also coming out the day after Thanksgiving, and I'm certainly thankful that I live on this amazing island and get to see such amazing sights.

Anyway, after hiking back up out of Kīlauea Iki, we drove down Chain of Craters Road. This is a short (23 miles, 38 kilometer) road that starts near Kīlauea Caldera and descends nearly 3,700 feet (1.130 meters), passing by several craters before plunging steeply down a scarp and ending abruptly at sea level along Hawaiʻi's barren, wind-swept south-eastern coast where it was covered by lava flows. Here, a patchwork of recent lava flows (many less than five hundred years old, and nearly all less than a thousand) contrast sharply with struggling, stubby ground-cover, providing a very different look from the lush rainforests where the road begins.

Down where the road ends in a small turn-around and some park buildings, there's a small look-out point facing the vast expanse of the Pacific ocean. Down the coast a few hundred feet we saw this nice-looking sea-arch carved by wave action in the hard lava rock.

Sea-arch on the south-east coast of Hawaiʻi.
Passing beyond where the road is closed to vehicle traffic, we walked along it for perhaps half a mile before coming to where lava flows between 1986 and 1996 covered it. It used to reach to the town of Kalapana further up the coast and serve as a second entrance into the park, but not anymore since Kīlauea begin its current eruptive cycle in 1983.

Looking back along the road from whence we came.
The sight of lava covering the road put me into a bit of a sober mood. It brought to mind Shelley's sonnet Ozymandias, and its theme of time and entropy's eventual triumph over man's accomplishments.


A weighty subject, to be sure, but it's very strange to see something as common and ubiquitous as an asphalt road covered in a lava flow. Most of the lava flows on the island are historical curiosities to me – although many of them are not that long ago, historically speaking, they're still from before I was born, and usually what you see is asphalt and other human structures on top of lava – not the reverse. The lack of context around the road makes it easy to imagine “this could be the road in front of my house covered in lava.” Although Hilo is in much less danger than most of the south and west coast of Hawaiʻi, it's always good to keep in mind the 1880 flow from Mauna Loa that came within a few miles of downtown Hilo – the Kaumana Caves that I've crawled around in came from that flow, and it came within a mile of where my current workplace is located.

Anyway, enough seriousness. Chain of Craters Road was actually first covered by lava in 1969. It was re-opened in 1979 before being closed again in 1986, but I imagine the sign I found below is from that time period:

You don't say...
By this point it was early evening and the sky was beginning to darken. After walking around on the lava near where it covered the road for a bit, we headed back to the car then drove back up Chain of Crater Road. A bit more than halfway along, we took a turn off for a lava tree forest. From what I've read, I gather that this was the original Chain of Craters road when it was created back in 1928, back when it merely took drivers out to Makaopuhi Crater (which is no longer accessible by road, only a hike). It wasn't until 1959 that it was extended to Kalapana to create the road we were driving on before.

Anyway, we drove a short distance along until reaching a parking lot shortly before the place where this original road was also covered by lava. Uphill from the road we found places where trees had been surrounded in lava and subsequently burned or rotted away, leaving holes where the trunks were. Sadly, it was starting to get dark, so I wasn't able to get many good pictures.


The hole you see there is a cast of a tree trunk. We found nearly a dozen in the area in the short time we were there, but most of them were not different enough from this one to bother getting a picture.


Well, except for these three. I found the collection of shapes to look rather like a surprised face. Lava apparently collected around the tree trunks forming raised, rounded shapes around them, so it makes a nice “head” with two holes for eyes and another (harder to see) for a mouth.

At this point the sun had gone down and it was quite dark, so we headed back to the car and drove back to the Jagger Museum outlook again. The sight was quite different from when we first came during the day. In the daytime, there isn't much to see except a large hole in the ground inside a larger depression, with a never-ending cloud of gas arising. At night time, all is cast into shadow, except for the still-ascending gas cloud which is lit from below with a fiery orange glow. This was definitely one of the high points of the day for me – seeing with clarity the light from Earth's molten core spilling out through this break in its flimsy crust. It was highly impressive, and I recommend going to see it if you ever get the chance.

Unfonrtunately, the darkness and the fact that I was trying to take a picture of a glowing cloud meant that I just could not get an acceptable picture, though not for lack of trying. Possibly with a tripod and a long exposure, but I didn't have one with my and short exposures just weren't cutting it. I really, really wish I had one to put up here, but the best I got is just a fuzzy, out-of-focus orange cloud. I was hoping to capture how the light from the lava lake was lighting up the far inner walls of Halemaʻumaʻu crater, but I just couldn't get the camera to focus. Perhaps another time.

And with that, it's time to wrap this series up. I'm planning on taking another hiking trip in the area tomorrow, so hopefully I'll have some new pictures up in a bit. A hui hou!

Thursday, November 21, 2013

Visiting Volcano National Park: Part II

Last post I introduced my trip to Volcanoes National Park last week. The first part was a bit short because I felt a single post would be too long, and the Kīlauea Iki hike really ought to get a post to itself.

Kīlauea Iki is the name of a pit crater that developed to the east of the main Kīlauea caldera in 1959, catching vulcanologists of the time by surprise and forming a lava lake measuring 0.7 by 0.4 miles. You can see it below as it looks from the trail head up on the top of the surrounding cliffs:

Kīlauea Iki, seen from the top of the cliffs around it.
The large bare hill in the center of the picture was created during the 1959 eruption from some spectacularly high lava fountains (up to 1,900 feet! [580 m]) and is known as Puʻu Puaʻi, which translates to something like “gushing hill.”

The trail makes a loop around the north rim of the pit, then dives swiftly down to the floor of the frozen magma sea and cuts across it back to the base of the cliffs below where the trailhead is, before steeply ascending to come out near another famous park sight, the Thurston Lava Tube (alternatively you can walk the trail in reverse order, that's just the way we went).

Here you can see the floor of Kīlauea Iki. The gray streak from left to right is the path.
Cores drilled in the lava field show that the entire lake solidified within a few tens of years after the eruption, but the rock is still quite hot. Putting my hand on it at one point I was surprised to feel that it was markedly hotter than would be expected from solar heating based on the weak sunlight coming through the cloudy, overcast sky. In a few places steam could be seen continually wafting off the surface, similar to the Steam Vents I showed last post.

Eventually we wound our way around the crater rim till the trail began to switchback steeply down the inside of the bowl, until we got to the bottom where this sight met our eyes:

Panorama of Kīlauea Iki. Ignore the horribly overexposed sky. Mouseover for original handmade panorama!
From the floor of the crater, a landscape more reminiscient of Mordor could hardly be imagined. For some reason this immediately suggested the following picture to me:

I mua! Forward!
After this, we set out across the great arid plain, following the trail to the base of Puʻu Puaʻi. Although the vast expanse of rock showed no signs of life from the crater rim (other than the many tourists wandering along its trail), we soon found various plants, shrubs, and even young trees sprouting up in places through the rock, clinging to life in an inhospitable environment. One such example is the ʻōhelo berry bush below:

ʻŌhelo berries growing in Kīlauea Iki crater.
ʻŌhelo (Vaccinium reticulata) are endemic to the Hawaiian isles and are adapted to grow on volcanic soil high up on the flanks of Hawaiian volcanoes. They're an important source of food for the state bird, the nēnē, and being relatives of cranberries and blueberries they are also human edible. ʻŌhelo berry jam from wild-picked berries is a popular home-canning project.

Near the base of Puʻu Puaʻi I found a large crack in the ground about as deep as I was tall, and tried to pose for a picture of me desperately hanging onto the edge. The lava turned out to be a lot sharper on bare skin than I had anticipated, however.


I did, however, manage to get the picture below:

Hang in there!
After these shenanigans at the foot of Puʻu Puaʻi, we set out on the trek across the main portion of the crater floor towards the far side and the trail leading back up to where we started. It was a fascinating experience, walking over the crystallized undulations of the solidified lava lake, its final random motions frozen in stone and time. Most extruded lava in Hawaiʻi is bumpy and rough to some extent, so it was very strange seeing (and walking on) such smooth rock. In places it had been broken up, victim to the stresses and strains of thermal expansion and contraction as parts of the lake cooled down unevenly. A little ways out from the base of Puʻu Puaʻi I looked back and got this picture:


At a few places on the crater floor steam was rising from the ground in a continuous display, reinforcing the Mordor look. You can see one such place in the picture below:


I investigated one to see if the steam was coming from a crack or other aperture, but it simply seemed to be rising straight out of the ground.

From across the floor of the crater we took one last look back at Puʻu Puaʻi across the frozen lava sea before turning and beginning the torturous ascent back to the crater rim.


I would have to say that this hike across Kīlauea Iki was the high point of the trip for me. There's just something incredibly cool about walking across the surface of what was a roiling, boiling lake of molten lava a little less than four score years ago. If you ever visit Volcanoes National Park, have the time, and are prepared for a hike of several miles, I would definitely recommend going on this one. Especially if you read some of the helpful information boards at the head of the trail first.

As a final photo, have this picture of an ʻōhiʻa lehua blossom that I took at the side of the trail along the rim of the crater. They're quite spectacular up close.


Anyway, that's been part two of my photo series. Tune in next time for the last part of our trip, and to see what happens when lava runs over a modern asphalt road! A hui hou!

Wednesday, November 13, 2013

Visiting Volcano National Park: Part I

Last Saturday I took a trip to Hawaiʻi Volcanoes National Park with some co-workers, a place I've only been to twice before and which I've been meaning to visit for some time now that I have a car. And because of the number of pictures I took, I'm going to split them up into three posts.

Volcanoes National Park contains the summit caldera of both the Mauna Loa and Kīlauea active volcanos, although the former has no visitor facilities and requires a strenuous several hour hike – minimum – to access, while the latter has plenty of paved road and ample tourist amenities. There is a lot to see in the Kīlauea portion of the national park – there are miles of hikes you can take, not to mention the miles of paved road running around craters and over fresh lava flows.

Anyway, upon reaching the park, the first place we stopped at was the Sulfur Banks and Steam Vents, a location on the northern rim of the Kīlauea caldera where steam continually rises from the ground. It's quite strange to see a constant stream of steam wafting up from the ground. It's unfortunately also hard to photograph, so I only have the one photo of one of the areas steam was coming from:

My friend Graham next to a steam vent. The hole is only about 6 feet deep, the steam rises off the floor.
After that, we went along the rim of the caldera to the Thomas A. Jagger Museum which has a great outlook over the caldera (along with a scientific monitoring station). It also offers a spectacular view of the vast length of Mauna Loa, which caught me completely by surprise with its incredible beauty.

Mauna Loa panorama from near the summit of Kīlauea. Mouse over to see the original panorama.
(Edit 5/27/2018: I've replaced the original hand-made panorama with one from Hugin, but you can mouseover the image to see the original.)

From an overlook on the north rim of Kīlauea caldera, we got an excellent overview of Halemaʻumaʻu crater within it. Halemaʻumaʻu crater has an active lava lake within in (though it is too low to be seen from the overlook at the moment), and has off and on for a few dozen years now. Below is a picture of Halemaʻumaʻu crater, with large clouds of poisonous sulfur dioxide gas rising out of it:

Halemaʻumaʻu crater.
This massive pit in the ground made quite an impression on me. Knowing that at the bottom lay a lake of molten rock, seeing the gases rising up from it...it was an awe-inspiring sight. According to what I read in the museum Kīlauea is estimated to have had a cone several hundred feet higher about 500 years ago that collapsed into a truly massive caldera, which over the intervening years gradually filled with more and more cooled lava until the present day where the floor of the caldera has filled to within 400 feet of the rim at most.

Kīlauea is a rather unusual volcano in its near-constant, yet gentle activity. Very, very few volcanoes actually have sustained lava lakes – in fact only four of them exist in the world at the moment. And most volcanoes when they erupt tend to do so much more violently, making it incredibly dangerous to be around them while they are active. Yet Kīlauea repeatedly has mild, effusive eruptions of lava that tends to move slowly enough not to be a threat, to the point where it's completely normal for people to walk up and poke sticks into it. It offers an almost completely unique chance to experience an active volcano without a corresponding probability of death closer to one than to zero. It's utterly fascinating, and if you ever get the chance to visit, do so.

Now, this has been a short post, but the next one will have a lot more pictures as it will deal with the incredibly cool Kīlauea Iki hike that we spent a few hours on. A hui hou!

Friday, November 8, 2013

A Hawaiian Sunset

Monday evening we had an absolutely gorgeous sunset here in Hilo. The clouds were unusually high in the sky, allowing the setting Sun to light them from beneath in a breathtaking fiery display.


Usually the clouds around here are a lot lower in elevation, and especially with the combined mass of Mauna Kea and Mauna Loa in the way to the west the Sun usually can't get beneath them to light them up like this. Since the summit of Mauna Kea is visible (to the left of the lamp-post on the right), these clouds must be higher than 14,000 feet (or 4,200 meters). Lovely sight, anyway. A hui hou!

Monday, October 28, 2013

Birth of a Genre: The Origin of the English Oratorio

I've written before about my love of classical music and my slowly-growing collection of oratorios. While most people my age are keeping up with the popular music scene, much of my music collection has passed its two-hundredth birthday already, and in some cases is pushing three hundred.

Case in point: last month I got Handel's oratorio Esther, originally composed in 1718 (and thus coming up on 295 years!). Most people only know Handel for his Messiah, but he actually wrote a total of 29 oratorios, 25 of them in English. In fact, Esther is the very first oratorio in English rather than German or Italian. Not just the first English oratorio Handel wrote, but the very first one ever. Handel had already achieved a measure of fame in writing Italian (and non-vocal) works, so this departure from his usual fare was unusual, and only done because it was a private commission. It was originally staged as a private performance only, and wasn't revised and publicly performed for over fourteen years.

(The story of how that happened is interesting; Handel had revised the original 1718 composition slightly two years later and this copy apparently fell into the hands of another music company sometime in the intervening eleven years, who then proceeded to put on what was essentially a pirated performance in 1731 which was a huge success. Handel responded by doing some more revisions and adding some new content and putting on a performance of the new and revised Esther the next year in 1732. [The recording I got is a reconstruction of the 1720 version, as best can be determined, however.])

When it was finally performed for the public, however, Esther's success helped show Handel that there was a lively market for classical music that the up-and-coming English-speaking middle class of Britain could actually understand. He came out with his second oratorio Deborah a year later in 1733, and their popularity helped convince Handel to make the switch from Italian to English works. Although he continued to write Italian operas for another ten years after this, of the twenty-three oratorios he wrote after Deborah only one of them was in Italian.

Anyway, I wrote this post because I wanted to examine the first ever English oratorio. I've had Deborah in my collection for some years now (it was the second oratorio I ever got, actually), and it's interesting to compare them. You see, I've always found Deborah to be rather slow and dragging, overall. I admit, I tend to prefer faster tempos in general (and Deborah has a few energetic fast pieces), but I think I can appreciate a good slow piece as well (and Deborah has some sublime ones). It's just that it tends to have a lot more of the latter than the former, and takes a lot of time for anything to happen. I had long unconsciously expected that Esther, being the first oratorio Handel wrote, would also be a bit slow and plodding. I figured that Handel was still finding his feet with these early oratorios, before he got better and wrote such masterpieces as Messiah, Saul, and Belshazzar.

The truth turned out to be a bit more complicated. For one thing, I hadn't really realized just how important the librettist is the finished product. Handel didn't come up with the words to his works himself, he simply set to music words provided him by a librettist. And different librettists had differing levels of competence in composing poetic English that can be sung easily. Some librettists worked with Handel over multiple years and provided the librettos for multiple oratorios (some of the better writers were in this category, thankfully), but the librettists for both Esther and Deborah were one-shots, making it impossible to compare them with anything else fairly.

The point is that Esther, although it also has a bit of plodding in its first half, has some surprisingly fun and peppy rhythms. Haman's first aria has to be the most upbeat and cheerful song about genocide I've ever heard. Once the second half rolls around the action picks up a bit and there are quite a few really good arias in quick succession through the remainder from Mordecai, Esther and Ahasuerus. It helps that it's a bit shorter than the norm for a Handelian oratorio – most run about two CDs long, while Esther only about three-fourths that.

Although I wouldn't classify it as one of Handel's masterpieces, Esther is a decent piece of oft under-appreciated music. After all, if it hadn't been performed without his permission and shown Handel just how popular music in English actually was, he might not have switched from writing Italian works, and we might not have the Messiah we have today. The list of oratorios in English is not over-large, and Handel is responsible for quite a sizable chunk of it. I always find it interesting seeing where things come from, and the origin of the English oratorio is a personally enjoyable subject.

Monday, October 21, 2013

Mentos and Diet Coke: An Explosive Combination

Some of you are probably familiar with what I'm about to write about from the title, others not. The “Diet Coke & Mentos Experiment” as it's come to be called is a fun experiment anyone can do with a minimum of equipment.

The experiment itself is quite easy to perform: procure some Mentos candies (the minty kind) and an unopened bottle of soda. Contrary to the experiment name, the soda in question doesn't need to be either diet or Coke (any opaque soda should theoretically work), but in practice it's good to use diet because it's going to go everywhere, and there's no sugar in diet soda so it doesn't leave a sticky, sugary mess when it's done.

Anyway, all you need to do at this point is set your bottle of soda (the 2-liter size works well) down somewhere it can stand up and a good ten feet or so away from anything you don't want to get showered in it. Then, with some Mentos in hand, unscrew the cap, quickly drop the Mentos in, and run! Shortly thereafter (we're talking no more than two seconds) a geyser of soda should erupt from the top of bottle in spectacular fashion for a few seconds.

Back in 2007 there were some videos on the fledgling website YouTube of some guys setting up chains of soda geysers in such a way that one's eruption would trigger the next, and so on down the line like a sweet, eruptive form of dominoes. They used some special equipment they'd made which screwed onto the tops of the bottles and let them drop the Mentos in with a quick-release system. I came across the video below, and decided to try it myself (with a single bottle of soda).


You can find out more about the making of this particular video here from the website of the guys who made it if you're interested.

I'm talking about this because last month I discovered that one of my co-workers had never tried the experiment before and was interested in doing so. Right after that, quite by chance I came across a variant of the quick-release devices used in the video meant to allow people to perform the experiment for themselves, so I snapped it up and together we set up the following demonstration just outside the office.


Pretty neat huh? We only used two Mentos in the quick-release magzine (which can hold up to five or six), so it wasn't the longest lasting eruption, but it's still pretty cool. You're probably wondering why exactly it does that. The short answer is that no-one is entirely sure, but we're pretty sure it's not a chemical reaction, as you might think; rather, it's a physical one. Soda, as you're no doubt aware, has a lot of carbon dioxide dissolved in it to give it its “fizz.” Mentos candies, for some reason, act as catalysts to bring that carbon dioxide out of solution by providing surface area where the dissolved gas can collect and precipitate out. It's similar to what happens when you shake or jolt a soda, which also causes the carbon dioxide to precipitate out of solution. As anyone who's tried to open a soda too soon after shaking it, all that carbon dioxide tries to forcefully exit the area as rapidly as possible, and often ends up carrying a significant amount of the soda along with it.

It's not only Mentos that can cause this reaction; dropping just about anything into a bottle of soda will cause at least a little fizzing. Mentos just happen to do it really, really, well on account of their surface structure having lots and lots of little tiny pits that make it very easy for dissolved carbon dioxide to collect and precipitate out.

Anyway, if you've got the time and inclination, give it a whirl! You can drink any leftover soda (it'll merely be a little flat), and eat the Mentos left at the bottom too if you want. It's a very fun experiment that's sure to get some remarks from onlookers.

Saturday, October 12, 2013

The Art of Powerbocking, and (Re)Learning to Walk

“The art of what?” I hear you say. Well, not actually hear you, but I'm betting something like that is going through your head if you aren't familiar with powerbocking. I know the feeling, because I've only been familiar with it for about a month now.

Powerbocking is...difficult to define. The best definition I can think of is that it is an “extreme sport” along the lines of skate-boarding or roller-skating. It's all about people taking a piece of equipment and seeing what it allows them to do.

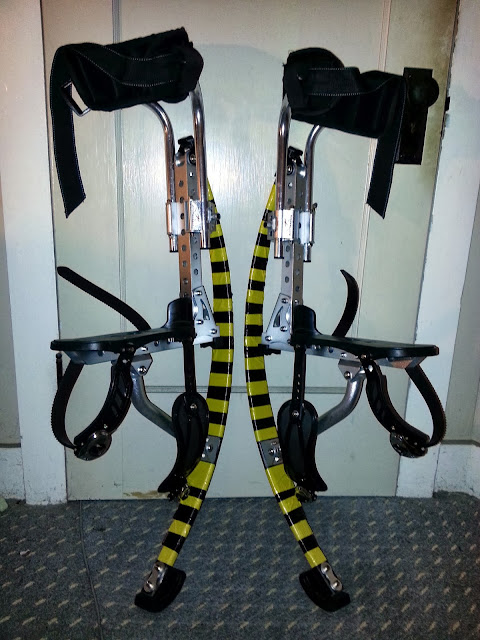
Or in this case, two pieces of equipment. Powebocking (or bocking, for short) requires a pair of powerbockers (or bockers, or bocks, or powerstilts, or...they have many names). Powerbockers are basically special boots with large fiberglass leaf springs attached that you strap onto your legs and walk around in about eighteen inches taller.

Or run, jump, or back-flip around in, depending on your preference and skill level. There's no external power involved; they rely entirely on your muscle power to function. They merely allow you to store more of the energy of your muscles in the springs, which basically act as (powerful mechanical) extensions of your Achilles' tendons. The best analogy I can think of would be that it's similar to having a pogo stick strapped to each leg. They tend to make the wearer end up looking like some sort of futuristic chimeric faun with the legs of a robotic gazelle.

Powerbockers were invented by a German aerospace engineer by the name of Alexander Böck back in 2003 and were eagerly adopted in Europe where they were first sold (hence the name “bocking” applied to the sport by practitioners). There are many different powerbocking clubs in Europe whose webpages you can find online. In contrast, adoption in the Americas has been much slower, to the point that I hadn't heard of them, ten years after they came out.

Why am I writing about this topic? Because I myself have now got a pair of bockers and have taken up powerbocking.


The fiberglass springs that make up the most important part of the bockers are seen here covered in the black and yellow alternating duct tape stripes I added to protect them. The black platforms halfway up are where your feet go (seen with the buckles for strapping them in), and the assembly at the top wraps around the leg just below the knee. At the very bottom are the rubber “hooves.”

I got my bocks about three weeks ago now, and have been enjoying them ever since. I quickly realized that despite the ease with which people reportedly pick them up, and my naturally good balance, they aren't just strap-on-and-go; I spent my first two sessions with them taking a few tentative steps and falling over (onto the soft grass of the front lawn, and with full protective gear, so no injury sustained).

At first my brain didn't know what to do. I would try to walk as I would normally, and immediately trip and fall. Powerbockers interfere with your normal muscle memory; your lower legs essentially become eighteen inches longer and end in small surfaces rather than your normal large-support-area feet. Although manufactured as light as possible, they're also still a good couple of pounds' extra weight on each foot. But the amazing thing about brains is, they can take new information, and adapt, even – perhaps especially – unconsciously. Those first two session were essential calibration sessions, my brain taking in every scrap of information about the new weights and moments of inertia of my new mechanically-imbued legs. So when I had my third session, something incredible happened: I was able walk (slowly) around the yard multiple time without falling once.

Ever since that session I've been getting better and better. My first walking was wooden and stiff-legged, which turns out to be surprisingly tiring. Two sessions later I found I had transitioned to a much more natural gait, which was a lot easier. It's been an interesting process of re-learning to walk. (I sympathize with toddlers a lot!) Thankfully, walking is something I do literally every day of my life, so my brain has almost 24 years’ worth of experience to pull from and use when coming up with a new walking model that allows me to walk with such different leg configurations.

The old aphorism that “you have to walk before you can run” certainly applies here, but I've recently begun to tentatively jog short distances. In fact today I spent an hour outside on my bocks, running up and down the road in short bursts. It's a slightly terrifying sensation, since you're vividly aware that you're simultaneously nearly two feet taller, have less balance surface, and move at a pretty good clip for even a small expenditure of energy. However, it's also absolutely thrilling, and I love it. That was really a large part of what made me want to get into bocking in the first place. I'm not exactly into the whole back-flipping, extreme tricks thing – but the idea of running fast with mechanical assistance viscerally appealed to me. (It's commonly reported on various bocking sites that experienced bockers can run up to 20 miles per hour [~32 kilometers per hour], something I'm rather looking forward to trying.)

I also hope to eventually get someone to get some footage of me bocking so I can put it up here, once I've gotten better and can do something more interesting than just walking and jogging around. Anyway, a hui hou!

Thursday, October 3, 2013

New Car!

Although this post is a bit late to the punch, as of the beginning of August I now have a car instead of the moped I've been using to get around town.

It's a Honda Civic LX, 2013 model, silver in color, and I love it. I've gotten progressively more and more tired of riding around Hilo in the rain, and have been thinking it'd be nice to be able to explore some more around the island.

To be clear, I haven't actually bought it, I'm just leasing it through the beginning of 2015 (which works out well since I expect to be attending graduate school somewhere else by the time 2015 rolls around).

It's got all kinds of nice features, like keeping me dry as I'm going about town. And air conditioning! And I can directly attach my phone with all my music on it to the sound system via auxiliary cable...very nice. Oh, and great gas mileage – I get about 27 miles to the gallon, which is pretty good considering nearly all of my driving is in the extremely hilly city of Hilo.

For those of you curious what it looks like, have some pictures:


Friday, September 20, 2013

Terra Nova Cognita

Planet Earth never ceases to surprise us. Within the past month we've discovered a canyon and a volcano, both of which are longer and larger than the previous record-holders in those categories.

The first record-breaker, known as the Greenland Grand Canyon, remained unknown until last month because it lies beneath Greenland's ice cap. It was discovered using ice-penetrating radar and is over 750 kilometers (466 miles) long, a bit less than twice the length of the Grand Canyon in Arizona (at 446 kilometers [277 miles] long. It's also up to 800 meters (2,600 feet) deep, and up to 10 kilometers (6 miles) wide. (Though Arizona's Grand Canyon is both deeper and wider in places.)

(The longest canyon in the world is actually the Yarlung Tsangpo Grand Canyon in Tibet, which is a bit longer than the Grand Canyon in Arizona, although I couldn't find solid numbers on how much longer. It is also the worlds deepest canyon, with a deepest point of 6,009 meters [19,714 feet].)

The second record-breaker is a volcano located on the Pacific sea floor about one-third of the way from Japan to Hawai'i. This humongous edifice goes by the name of Tamu Massif, and while it has been known since at least 1993, it was previously thought to be multiple volcanoes due to its incredible size. On it September 5th it was announced by scientists studying it that it was actually a single volcano, which made it the largest volcano on earth.

This announcement was of interest to me, since I live on the flank of what was previously thought to be the largest volcano in the world – Mauna Loa. When we say “largest,” we should be sure to define what we mean. Tamu Massif is larger in surface area than Mauna Loa, but shorter in height. Mauna Loa has a surface area of 5,000 square kilometers (about 1,900 square miles), and rises an incredible 9,170 meters from the sea floor (30,085 feet). Tamu Massif, by contrast, rises a mere 4,460 meters (14,620 feet) from the sea floor, but has a surface area of 260,000 square kilometers (100,000 square miles), approximately the size of New Mexico.

Despite its height, the summit of Tamu Massif is still 1,980 meters (6,500 feet) below the surface of the Pacific Ocean. This is because it has an incredibly gentle slope (it's also long extinct, so it's not getting any higher). Mauna Loa has slopes that don't exceed an average inclination of 12 degrees, but Tamus Massif's sides have an average inclination of no more than a single degree.

Tamu Massif has some interesting similarities with a volcano on Mars called Alba Mons. Since “Everything's Bigger on Mars” when it comes to geological features, it's no surprise that Alba Mons is larger than Tamu Massif. In terms of surface area it stretches for a good 1,000 by 1,500 kilometers (620 by 930 miles). Like Tamu Massif, it too has incredibly gentle slopes of 0.5 degrees on average.

It's not surprising that these incredible features of our world could remain hidden for so long, given their locations under ice cap and ocean. It's definitely exciting that we're starting to discover them. Who knows what else there is out there waiting to be discovered? A hui hou!

Sunday, September 8, 2013

Science Clock Series: Part XII

This little series is finally drawing to a close with today's number, which comes from meteorology, and is given by:

\[\text{hurricane (Beaufort scale)}\] This is another straightforward number from the realm of atmospheric science. The Beaufort scale (officially the "Beaufort wind force scale") is a system devised by a certain Sir Francis Beaufort in 1805 as a way to standardize the reporting of wind speeds by ships and weather centers.

Wind speed can be fairly subjective – one person's "stiff breeze" might be another's "light wind," for instance – and it was long recognized that a standardized system for measuring wind speed would be a good thing. Beaufort wasn't the first to work on such a scale, but his position in the British Royal Navy in the 1830s allowed him to get his officially adopted.

The Beaufort scale has twelve categories, going from 1 (completely calm) to 12 (hurricane force winds). The categories were originally defined by the effects they produced (on the ocean, on ships' sails, or on various terrestrial objects), due to the difficulty in measuring the wind speed directly. Once practical, reliable anemometers (wind-speed measuring devices) became widespread, the different categories became defined by specific wind speeds as well.

Beaufort originally defined the scale to go up to 12, but in 1946 an extended scale was proposed going all the way up to 16. The wind speeds in this range are pretty much only encountered in tropical cyclones, and the extension only ever caught on in Taiwan and China, both of which deal with tropical cyclones on a frequent basis.

I'd reproduce the Beaufort scale table in this post, but unlike the Mohs scale of mineral hardness, it's pretty long and involved. If you're interested, I suggest perusing it on Wikipedia at the link just above.

And with that, this series is officially over. It was an interesting experience; I learned some things myself, both about the subjects in question and in running a series of posts. I apologize for the tardiness with which I've been updating lately; I sometimes found that having a set subject to post about next left me undermotivated.

Anyway, it's over now, and I have a couple of new post ideas in mind. What will come next? You'll just have to wait and see. A hui hou!

Sunday, August 25, 2013

Science Clock Series: Part XI

Today's number comes from astronomy and is given by:

\[\approx\ \text{diameter of ♃(in \(\beta\); \(\oplus=1\beta\)}\] This is a slightly roundabout way of saying "approximately the diameter of Jupiter in Earth-diameters." Let's look at it a little more closely:

First of all, what in the world is ♃ supposed to be? Or \(\oplus\)? To answer those questions we need to go back in time. About 2,000 years in fact, give or take. You see, one thing that I've learned from idly inspecting ancient writing, whether written, inscribed, or etched, is that ancient people liked to abbreviate.

Although it surprised me at first, this is entirely reasonable when you think about it; we do it all the time in everyday life, especially with the proliferation of instant messaging. Ancient peoples had to write everything by hand, which in my opinion is very dull and tiresome. You start looking for ways to reduce the amount you have to write, and before you know it you've got abbreviations all over the place.

Anyway, writing goes back a long time, but for much of history it was limited to a thin slice of the most educated in society. The study of astronomy also goes back a long time, and was one of the most common subjects for that educated elite to study, given its importance to pre-Industrial societies in helping to determine things like the proper time to plant and harvest crops in order to ensure everyone didn't starve over the winter.

Put those fact together, and people have been writing about astronomy for a very long time. Some of the oldest writings we find have been discovered to be about astronomy. Since it was so important, and given that most people like to save time and effort when writing, ancient astronomers in the Hellenistic period around the time of Christ came up with a set of symbols to refer to the "planets."

Note that the word "planets" in this context refers to the seven "planets" of the Ptolemaic (and originally Aristotelian) heliocentric system: the Sun, the Moon, Mercury, Venus, Mars, Jupiter, and Saturn.These are the objects which, if you're familiar with the night sky, appear to move across it against the background of the fixed stars. Anyway, ancient astronomers came up with symbols for them that were used up through the Renaissance period. In fact, their use was so common that when astronomers such as William Herschel started discovering new planets astronomers rapidly came up with new symbols for them too. Anyway, here's a table with the symbols for the Sun, and the eight planets discovered before 1900:
\begin{align*}
\text{Sun}&\dots☉\\
\text{Mercury}&\dots☿\\
\text{Venus}&\dots♀\\
\text{Earth}&\dots\oplus\\
\text{Mars}&\dots♂\\
\text{Jupiter}&\dots♃\\
\text{Saturn}&\dots♄\\
\text{Uranus}&\dots♅\\
\text{Neptune}&\dots♆
\end{align*}You may be familiar with the symbols for Mars and Venus, as they have come to stand for “male” and “female” respectively in modern usage. Other than that, the only symbols commonly used in astronomy any more are the ones for the Sun and Earth. It's standard practice in astronomical journals for the symbols \(\text{R}_☉\), \(\text{M}_☉\), and \(\text{L}_☉\) to stand for the mass, radius, and luminosity of the Sun, respectively (and similarly for the Earth using the symbol for Earth).

It might give you some indication just how little known these symbols are today if I told you that right up until I looked them up to write this post I thought the symbol for Jupiter on my clock stood for Neptune!

Now that I know it stands for Jupiter, we can look at what the clock actually says: approximately the diameter of Jupiter in terms of “beta”, where “Earth” = 1 “beta.” I actually looked up beta to make sure there wasn't some special use for it that I wasn't aware of and couldn't find anything, so I'm not entirely sure what the point of introducing it only to immediately define it as one Earth was. Anyway, if we then check with the diameters of both Earth and Jupiter, we find that Jupiter does indeed have a diameter about 10.9377 times greater than Earth's.

So there you have it. And I realize this post isn't actually as short as I promised last time, though hopefully it was still interesting. There's a lot related to the astronomical symbols that I didn't cover, such as the fact that several were created for the first nineteen asteroids discovered before people realized that creating unique symbols for every asteroid would be effectively impossible and gave up (given that we now know of over a hundred thousand asteroids and suspect there may be ten times that number in the solar system, we can see that this was a good decision!).

Anyway, check back for the final post in this series, with a number from meteorology! Click here to jump directly to it.

Wednesday, August 21, 2013

Science Clock Series: Part X

It's been a while since my last post, and I figured you all deserve an explanation. I was in Nebraska all last week attending my grandfather's funeral, immediately after serving as a groomsman for a wedding in Kona. It's been a hectic fortnight. Between helping out around the family farm and catching up with relatives I haven't seen in years, this blog got put on the back burner. I'm now back in Hawaii, however, and getting back into the swing of things.

Anyway, today's number comes from both physics and biology, and is given by:

\[\lambda\ \text{of human body heat (in \(\mu\)m)}\] The Greek letter lambda \((\lambda)\) in this equation stands for “wavelength,” specifically the wavelength of the electromagnetic radiation given off by an object at average human body temperature. The symbol \(\mu\) is the Greek letter mu, and is an SI prefix denoting micro-, or one-millionth of something. So a micrometer is a millionth of a meter.

To understand this subject fully requires a short history lesson, and an understanding of the term “black body.” A black body is an idealized object that absorbs all electromagnetic energy that hits it, no matter what angle it hits at or how powerful it is. Being an ideal object, true black bodies don't exist in nature, but many things come pretty close. It's important to realize that a black body may not (and in reality will not) be actually black. A black body at any temperature above absolute zero (that is, all of them) will emit electromagnetic radiation in a characteristic energy distribution called “black-body radiation” that depends only on the temperature of the object: not what it's made of, not its shape, just its temperature. If the temperature is hot enough, a black body will emit light in the visible portion of the spectrum and visibly glow.

One example of a class of objects that approximate black bodies is stars. This may seem strange to you, because stars are anything but black – but it goes back to what I said earlier. When you think about it, stars really don't reflect any of the electromagnetic radiation that hits them. They absorb it, then re-emit it in a characteristic black-body spectrum. (It's not perfect because the presence of various elements in stars modifies it somewhat, but it's close enough to be able to measure the temperature of stars by measuring the amount of light they give off over all parts of the spectrum.)

Now, although there are no true black bodies in the universe, most things actually come pretty close. Some brilliant physicists in the late 19th and early 20th centuries formulated a couple of equations that describe the amount of electromagnetic radiation given off by a black body, per either unit wavelength or frequency. Once you know that, you can figure out where exactly on the spectrum an object is radiating most strongly at. A German physicist by the name of Wilhelm Wien deduced what is now known as Wien's Displacement Law in 1893. In symbols, it looks like: \[\lambda_{\text{max}}T=b\]In words, it says that as a black body (which is a good approximation for most objects remember) gets hotter, the wavelength at which it radiates most strongly becomes shorter and shorter; or alternatively, it produces more energetic light.  The Greek letter \(\lambda\) (lambda) stands for wavelength, the T stands for the absolute temperature in kelvins, and b is a quantity known as Wien's Displacement Constant, approximately equal to \(2.8977685\times10^{-3}\,\text{m}\cdot\text{K}\).

Now that we have an equation to use, it's a simple matter of algebra and plugging in numbers. Rearranging it to solve for the wavelength we get \(\lambda_{\text{max}}=b/T\). Despite what we all learned growing up, there isn't actually such a thing as a “normal” human body temperature; it varies by individual, time of day, state of the body itself, and many other factors. However, a value of 98.6 ºFarenheit works well enough as a good “average” temperature, so let's go ahead and use that. Converting to the Kelvin scale, we have:
\begin{align} [\text{K}]&=([^\circ\text{F}]+459.67)\times\frac{5}{9}\\
&=(98.6+459.67)\times\frac{5}{9}\\
&=310\ \text{kelvins}\end{align}Plugging that number in for the temperature in Wien's Displacement Law gets us:
\begin{align}
\lambda_{\text{max}}&=\frac{b}{T}\\
&=\frac{ 2.8977685\times10^{-3}\,\text{m}\cdot\text{K}}{310\,\text{K}}\\
&=9.34\times10^{-6}\,\text{meters}
\end{align}This is great and all, but our answer's in meters, not micrometers (\(\mu\)m) as it needs to be. One micrometer is \(1\times10^{-6}\) meters, however, so we need merely convert to get \(9.34\,\mu\)m. Which is fairly close to ten (within 10%), but actually closer still to nine. Oh, well. It was approximate.

This 9.34 \(\mu\)m, by the way, is a wavelength that corresponds to the far infrared. We humans constantly radiate at a range of wavelengths – near infrared on the shorter side, for example, sub-millimeter on the longer – but that wavelength (or near to is) tends to be where we radiate most strongly. And there's really not much we can do about it, since as endothermic creatures our bodies try to keep themselves in a tight specific temperature range. Though I can't think of any reason you'd want to change your peak radiating wavelength. We can't see in infrared, so it doesn't really matter. (If you're curious, it requires being a few hundred degrees hotter before the peak wavelength shifts into the visible portion of the spectrum and things start visibly glowing. If you have an electric stove, you can see this effect in action as it heats up: the point where it starts to glow is when it becomes hot enough to start radiating significantly in the visible region.)

Anyway, that was quite the lengthy post. Tune in next time for a much shorter one where we look at a number from astronomy again! Click here to jump directly to the next part.

Tuesday, August 6, 2013

Science Clock Series: Part IX

Today's number comes from chemistry, and is given by:


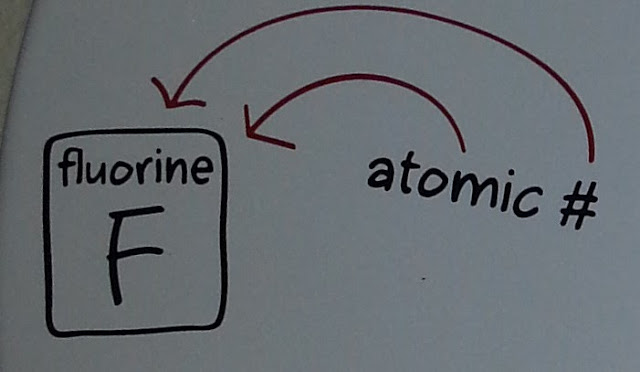
This one is quite straightforward; it's just the atomic number of the element fluorine.

As you probably remember from chemistry class, each element is uniquely described by something called its atomic number. This number is simply the number of protons in the nuclei of the atoms of that element. The number of protons determines how many electrons make an electrically balanced atom, and also how many electrons the atom will strive to attain (which are only the same number in the case of the noble gases, and hydrogen, somewhat).
You see, due to some slightly complicated features in quantum mechanics that I should talk about some day, not all electron configurations are created equal in energy. Many atoms, especially of the lighter elements, try to reach the same number of electrons as the noble gas closest in atomic number to them because that represents the lowest possible energy state for them.

Fluorine is a fairly light element. Its atomic number, nine, is just above oxygen (eight), and just below the noble gas neon (ten). It therefore wants to gain one more electron to bring it into a lower energy state. Now, if you know your chemistry, you know that oxygen is a highly, highly reactive element. Fires and explosions? Caused pretty much entirely by extremely rapid reaction of oxygen in the air with certain materials. From a biological standpoint, oxygen is pretty dangerous stuff if it gets where it isn't supposed to be because it can react with so much delicate biological machinery (which makes it even more amazing that our bodies run on the stuff). Single oxygen atoms that get loose in the body are classified as free-radicals, and can contribute to cell mutations and cancer if they react with DNA. Even in bulk, diatomic oxygen (the kind we breathe) can be dangerous if you get too much of it, in a condition known as oxygen toxicity.

Now, as bad as oxygen is, fluorine is worse. Much worse. It is the most reactive and electronegative element in the universe. Oxygen can actually exist in the Earth's atmosphere for a fairly long time as a diatomic molecule. Fluorine is much too unstable for that. Although it can (and does) form a diatomic molecule when isolated by itself, once free from containment it vigorously sets to work oxidizing  anything it comes into contact with  extremely rapidly. Quite a lot of substances will burn frighteningly quickly upon exposure to pure fluorine, including things we don't normally think of as flammable, such as iron wool. Or water, which will burn upon exposure to fluorine.

This video, from the Periodic Videos collection, shows some reactions of fluorine with things such as iron wool, charcoal briquettes, and a lump of sulfur:


Now, fluorine may go about obtaining its extra electron very violently, prying it out of the grasp of any other atoms it comes across if it can (barring helium and neon); however, once it has achieved the low energy state it finds itself in, it's actually quite tame. Fluorine with this extra electron is called fluoride (which is an ion since it is no longer electrically neutral), and it is quite happy to share this electron with another atom leading to exceptionally strong chemical bonds.

In fact, you probably have more exposure to fluoride than you might think if you use Teflon cookware. Teflon is the brand name for a chemical known as polytetrafluoroethylene, which is pretty much nothing but long chains of carbon atoms each with two fluorine atoms attached to it. Because these fluorine atoms bind so strongly to the carbon atoms they are highly reluctant to attract anything else, which is why Teflon is so slippery (it is the third most slippery substance known, and in fact is the only known material to which a gecko cannot stick).

Fluoride is also useful in another manner than ties back to number seven on the clock: remember how in the discussion of the Mohs scale of mineral hardness I mentioned that your teeth are made of a form of apatite and thus had a hardness of about five? Well, it turns out that tooth enamel is vulnerable to decay in acidic environments, such as your mouth after drinking anything acidic (like soda) or consuming sugar (bacteria in your mouth create various acids as they consume the sugar, again lowering the pH around your teeth).

Now, it turns out that if you have fluoride ions in your mouth, they will tend to bind themselves over time to the surface of your teeth, changing the enamel from hydroxyapatite to fluorapatite, which is much more resistant to attack by acids (in essence, the fluorine atoms bind tightly to the tooth enamel, making it harder for other materials such as acids to reach the enamel). Many toothpastes now contain fluoride, and it is often added in small amounts to drinking water. The nice thing about fluoride ions is that they're inert enough that they really don't interact much with the rest of you, passing through harmlessly.

So there you go. The universe's most reactive (and one of the more dangerous) elements, serving double duty to make our dish-cleaning less tedious and our teeth better protected from cavities. All around a fascinating element, and I highly recommend you read up on it yourself – there's much more to be said about it than I can fit in this post.

Anyway, check back next time for a number from physics and biology! Click here to jump directly to it.

Thursday, August 1, 2013

Science Clock Series: Part VIII

Today's number comes from astronomy, and is given by:

\[\approx\text{distance to center of Milky Way (kpc)}\]
This one is pretty straight forward, though it requires a fair amount of exposition. The Milky Way, of course, is the galaxy within which we all live. As far as we can tell from our inside perspective, it is a barred spiral galaxy, like many others throughout the universe. 

The letters "kpc" stand for "kiloparsec," an astronomical unit of distance. "Kilo" is the SI prefix for a thousand, so we're dealing with a thousand parsecs. Just what is a parsec, though? A parsec is defined as the distance at which an object has an astronomical parallax of one arcsecond. Parallax is the way objects appear to move when you look at them from two different positions, when compared to even more distant objects.

(To see this effect, close one eye and line up your thumb at arm's length with an object across the room. Now switch eyes, and notice how your thumb is no longer in line with the object. This is the reason we have two eyes, in fact; our brain takes the slight differences in the angles between them and interprets it as distance. If you can measure the parallax of an astronomical object, you can mathematically work out its distance in a similar manner.)

An arcsecond, as I've discussed here before on this blog, is a unit of angular measurement (and a very small one at that). For comparison, there are 60 arcseconds per arcminute, and the full Moon (and Sun) are about 30 arcminutes in angular diameter. Thus an arcsecond is about 1/1800 the width of the full Moon.

This is a pretty small amount. And yet, there are no stars within 1 parsec of the Sun, so every star in the sky has a parallax smaller than 1 arcsecond. This is much, much too small to be noticed with the naked eye, and it wasn't until 1838 that the first measurement of a star's parallax was made by the German astronomer Friedrich Bessel. (The closest star to the Sun, Proxima Centauri, is 1.3009 parsecs away, or 4.243 light-years.)

Anway, that's how you define a parsec, but what does it mean in units your or I might be more familiar with? When you do the math a parsec works out to be approximately 3.26 light-years, or 30.9 trillion kilometers, or 19.2 trillion miles. A kiloparsec, then, is a massive 30.9 quadrillion kilometers, or 19.2 quadrillion miles, or 3,260 light-years.

This...is a long way. It is simply too large a distance for me to truly comprehend it. And yet we need such large units to meaningfully talk about our galaxy, which is around 31-37 kiloparsecs across (100,000-120,000 light-years). It's hard to put a solid number on it since the galaxy has no hard edge, but rather fades out around the edges. This gives it a radius of about 15-18 kiloparsecs, and as far as we can tell, the Solar System is located between about 8.0 and 8.7 kiloparsecs from the center of the galaxy (roughly 26,000 to 28,000 light-years), putting it about halfway out, nestled between two of the Milky Way's spiral arms.

Check back next time for a number from chemistry! Click here to jump directly to it.